Custom PPF Template Solution for a New Ford F-350 Tremor
Working on new vehicle models can sometimes create problems that have nothing to do with our ability to install PPF. Sometimes the problem is simply that the vehicle is so new that the global PPF template suppliers haven’t caught up yet.
That was the situation we faced while working on this new Ford F-350 Tremor.
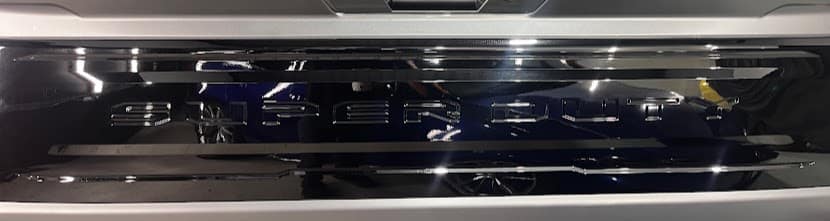
One of the areas we wanted to protect was the gloss black plastic centre garnish across the tailgate. It is a large, highly visible black panel with the SUPER DUTY lettering recessed into it.
The problem was that we couldn’t find a suitable PPF template for this particular panel.
We checked the template options available to us, but nothing was suitable. Rather than giving up or attempting to hand-cut the entire pattern directly on the vehicle, we worked out another way.
Using the SUPER DUTY Lettering to Find the Correct Scale
We started by physically measuring the SUPER DUTY lettering on the actual vehicle.
The overall measurement was approximately:
1140 mm wide × 42 mm high.
We then went back into our PPF pattern software.
There was a tailgate template available that contained the lettering, but the overall template wasn’t suitable for the panel we needed to cover. We ungrouped the template until we were left with only the individual SUPER DUTY letter pattern.
We then scaled those letters to match the measurements we had taken directly from the F-350: 1140 mm × 42 mm.
Bingo.
We now had the correct size and aspect ratio for the lettering on the actual vehicle.
From there, we could create a rectangle around the lettering that was larger than the gloss black garnish itself. This gave us an oversized, computer-cut piece of PPF with the SUPER DUTY lettering already accurately cut into the film.
It was a simple solution once we worked it out, but it solved a problem that an off-the-shelf template couldn’t.
Why We Didn’t Try to Wrap 10 Mil PPF Deep Into Every Letter
This particular installation was using thick 10 mil PPF.
Trying to force material of this thickness down into every small, sharp recess of the SUPER DUTY lettering would create unnecessary risk, particularly against a gloss black surface.
There is a good chance you would eventually see some combination of film distortion, adhesive marks, texture or small areas of tunnelling around the tight recesses.
Another potential problem is cloudy adhesive spots.
This can happen when air remains trapped for too long or when too much alcohol is used in the installation process. The issue is not necessarily the clarity of the PPF itself. It is the adhesive layer underneath losing some of its optical clarity.
Once that happens and the film is pushed back down, a small cloudy area can remain visible.
On a gloss black panel, that matters.
Black shows everything.
The tiniest amount of adhesive texture, film distortion or cloudiness can become visible under the right lighting. On a much lighter coloured surface, some of these minute imperfections may be considerably harder to notice.
Our aim was therefore to achieve the cleanest-looking result rather than forcing the PPF into areas where the thickness and shape of the film were working against us.
Why We Waited More Than 30 Hours Before Final Trimming
Once the oversized computer-cut PPF was installed, we didn’t immediately start trimming it.
We left the material for more than 30 hours.
This gave the moisture around the edges time to dry naturally and allowed the adhesive to progressively activate.
When possible, I prefer allowing PPF to dry naturally rather than trying to force the process with excessive heat.
When you are working around detailed edges and highly visible gloss black surfaces, patience can help reduce the risk of adhesive marks, distortion and unnecessary texture.
Once the material had dried sufficiently and the adhesive had started to establish a stronger bond, we could move on to the final trimming.
A Clean Flush Edge Without Cutting Directly Across the Panel
The final step was trimming the excess PPF around the outside edge of the garnish.
Rather than cutting across the face of the painted or gloss black panel, the side of the blade can be positioned flat against the existing panel edge.
With a small amount of controlled tension applied to the excess PPF while cutting, the film can be trimmed to create a clean, flush finish.
This is very different from simply putting a blade onto the visible face of a vehicle and cutting a pattern by hand.
Wherever possible, I don’t believe it is worth taking unnecessary risks cutting directly on a customer’s panel when another method can achieve the result.
Sometimes PPF Installation Is About Solving Problems
Modern PPF installation relies heavily on computer-cut templates, and they are incredibly useful.
But templates don’t solve every problem.
New vehicles arrive on the market faster than pattern databases can always keep up, and occasionally a template simply isn’t available or doesn’t suit what we are trying to achieve.
That’s when experience and a bit of lateral thinking become important.
For this Ford F-350 Tremor, the solution came from combining something we could physically measure on the vehicle with information we could extract from an existing digital pattern.
We measured the lettering.
We isolated the digital letters.
We scaled them to the actual vehicle.
We created an oversized pattern.
We installed it.
Then we gave the PPF more than 30 hours to dry before completing the final trimming.
Problem solved.
It may not be the most complicated solution in the world, but it meant we could protect a difficult gloss black panel on a new vehicle without waiting indefinitely for someone overseas to eventually produce the exact template we needed.
And most importantly, we could do it without taking unnecessary risks with the customer’s F-350.
Learn more about PPF here